CBOS 101
Introduction
This document is intended as a general overview of the CBOS system. Links for training exercises are provided, which can be done either via self-study or in conjunction with a live or recorded training session.
It is important to note that the system used for training has been pre-configured with the necessary setup items and parameters. In real-world use, your own data and configurations will of course be used. Links to system setup and other advanced topics are provided, which can be used in conjunction with the assistance provided by your Implementation Consultant. However, it is recommended that you first run through the basic scenario and lab exercises before pursuing more advanced topics.
For information on navigating within the system, you may wish to refer to the following topic: Basic Navigation.
Basic Transaction Processing

The basic transaction steps are shown in the flowchart above:
- Products are purchased from a vendor/supplier, received and paid for
- Products are sold to a customer
- The financial transactions are recorded in process and posted to the general ledger
Each of these is covered in more detail in the sections below.
Purchase Product(s) from Vendors
The process of purchasing a product from a vendor has its own discrete steps, as shown in the following diagram:

These consist of creating and transmitting a purchase order document to the vendor, receiving the items that the PO described, and receiving and paying the vendor bill. The specifics of these steps are described below.
(As noted previously, for purposes of this exercise the vendors and products have been pre-configured.)
Creating a Purchase Order
There is also a snippet for this topic, varies from the content that is here.
The first step in the process is to create a purchase order. Use the side menu to navigate to Purchases > Transactions > Purchase Orders. This will bring up the standard grid view. POs use the standard CBOS format of a main header record, with additional tabs for line items and other fields.
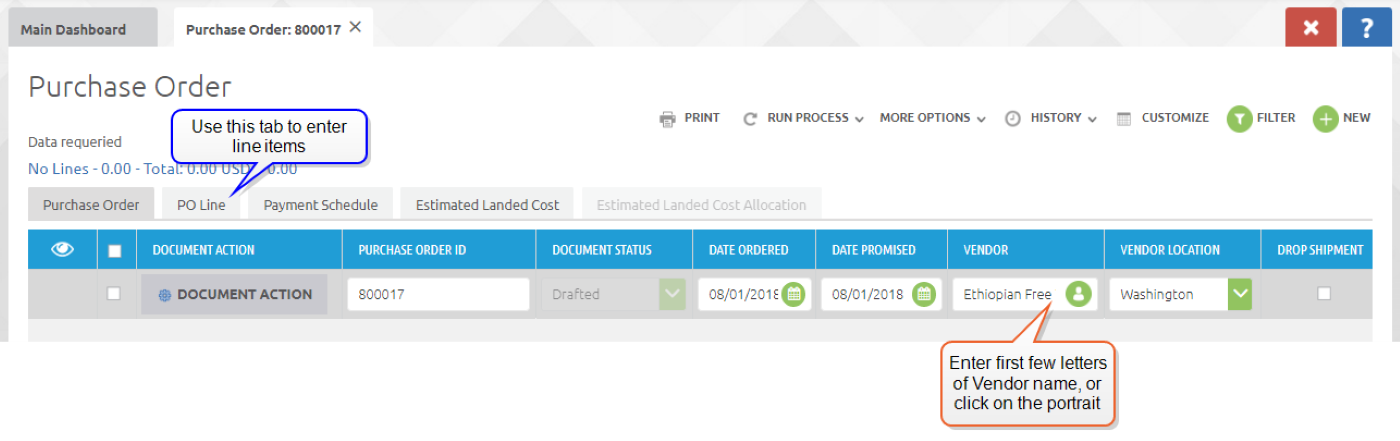
To create the PO record, use the ![]() button on the upper right in the window. In the new line that is created, enter the vendor name or select the green portrait icon in the right side of the field to bring up an item search window. (For more information see Item Search Window.) This will populate the information associated with that vendor.
button on the upper right in the window. In the new line that is created, enter the vendor name or select the green portrait icon in the right side of the field to bring up an item search window. (For more information see Item Search Window.) This will populate the information associated with that vendor.
In the example below, we have created a PO header record for the vendor "Ethiopian Free Trade Consortium".
Once the header record has been entered, you can enter the line items to be purchased using the PO Line tab. In the example below, we have added a line item for one 50lb bag of coffee.

Once all of the line items have been entered, navigate back to the PO header record by selecting the Purchase Order tab. Then, use the DOCUMENT ACTION button on the PO record to complete it.
Note that the PO DOCUMENT STATUS fields is now "Completed".

The PO will now be ready to print and transmit it to the vendor. To print, select the PO line and use the PRINT button.
Lab Exercise: Create a Purchase Order
Material Receipts
Now that products have been ordered, the next step is to receive them from the vendors. Recording the physical receipt of goods and posting them into inventory is done via the Material Receipt process.
Since the materials received will correspond to a purchase order, we start there. Navigate to the Purchase Order window (Purchases > Transactions > Purchase Orders) and select the PO record that corresponds to the shipment you have just received. (Typically the PO number will be on the packing slip.)
If you do not see the completed purchase order, you may need to use the ![]() button to find it. In this example, we are using the PO that was issued to vendor "Ethiopian Free Trade Consortium".
button to find it. In this example, we are using the PO that was issued to vendor "Ethiopian Free Trade Consortium".
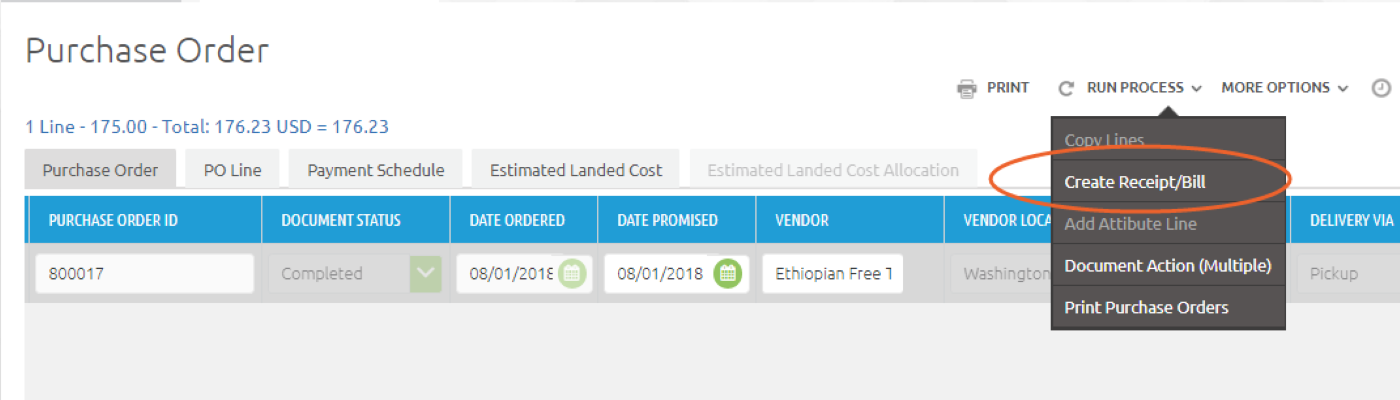
Use the RUN PROCESS menu on the selected record to run the process "Create Receipt/Bill":
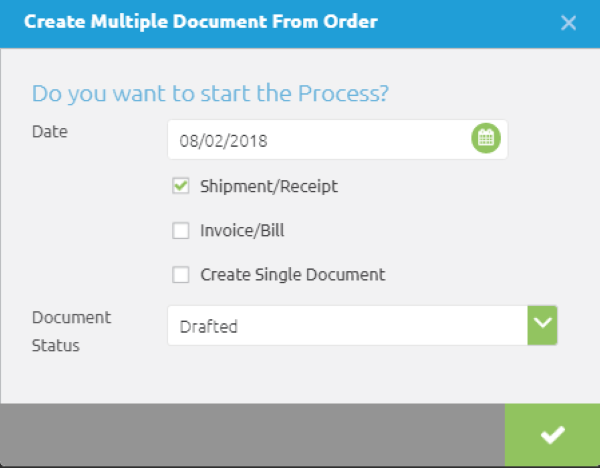
This will bring up a dialog box. The Shipment/Receipt box should be checked, and the Document Status field should be set to "Drafted". (This will allow you to make changes to quantities should it be necessary.)
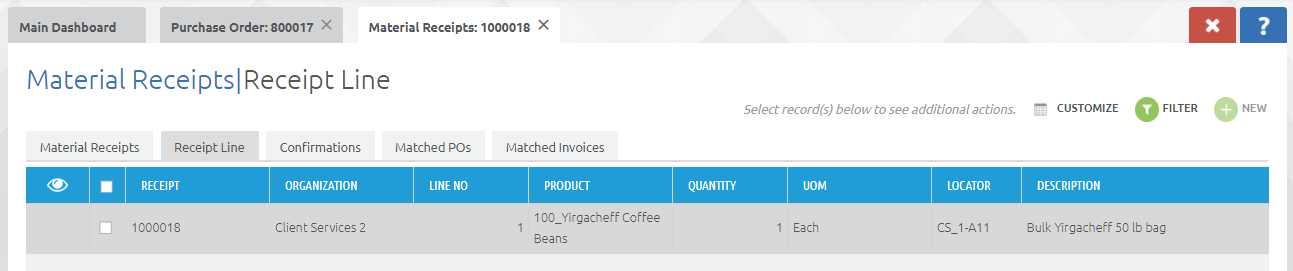
Clicking on the green check mark will create the material receipt record and bring up a dialog that displays the PO number and the number of the material receipt record, and download a csv file with status information. Note that the record number is a link that will take you to that record in the Material Receipts window.

The material receipt record has a similar format to the PO: There is a header record, and a Receipt Line tab that lists the items and quantities that were on the corresponding PO lines. (In this case, one 50lb bag of Yirgacheff coffee beans.)

When you set the material receipt document to status "Completed" using the DOCUMENT ACTION button, the items will be posted into inventory. (This will also cause a POSTED button to appear on the material receipt record. Clicking on this button will show the inventory transactions.)
Lab Exercise: Material Receipts
Vendor Payment
Entering Vendor Bills
Now that the products have been received, we can assume that a bill from the vendor requesting payment will soon be forthcoming. Payment of vendor bills/invoices involves two steps: First, the invoice details are entered into the system. Then, the payment to the vendor is generated based on that invoice data. (Side note: The item cost is also set when the vendor bill is input, based on the line item cost on the bill.)
To input a vendor bill (invoice), navigate to Purchases > Transactions > Bills and create a new record. In the new record, select the vendor that the bill is from, and then use the CREATE LINES FROM button to bring up a dialog box. In this dialog box, you can select from the existing material receipts for this vendor (labeled as "Business Partner" on this dialog). Upon selection, the line items for that material receipt will be shown. Select all of the line items and click the green check mark button.

After clicking the green check mark button, you will be returned to the Bills window, where you will see the new drafted document in the typical form, with the line items listed in the Line Detail tab. The due date for the bill will be automatically assigned based on the payment terms that were configured for the vendor.
Set the document status to "Complete" using the DOCUMENT ACTION button.
Lab Exercise: Enter Vendor Bills
Paying Vendor Bills
Now that the bills have been entered into the system, they are available for payment. The system can generate printed checks, or record payments made through other mechanisms such as credit card or cash. For payments by check, the most expedient way to review bills and process them for check payment is to use the "Select Bills to Pay" window. (Purchases > Transactions > Select Bills to Pay).
The bank account field is used to select which account the bills will be paid from. Document type will typically be "AP Invoice". The "Only Due Invoices" will display only those bills that are currently due. The payment rule field will set the search for bills that were entered with the specific payment rule. This will typically be "On Credit" for those vendors who are set up with payment terms such as Net 30.

Select the bills that you wish to pay from the displayed list, and click on the Gear icon. This will bring up a series of two dialog boxes. The first will confirm that you wish to generate a check run. The second will ask if you want to create Prepared Payments:

Confirming this dialog will run the process and then return you to the Payment Selection window. The process will do three things:
- It will create a payment record
- It will generate a "prepared check run" record, which will be used to print the check(s)
- It will create the journal entries for the payments
Lab Exercise: Select Bills to Pay
You can now use the Print Checks window (Purchases > Transactions > Print Checks to do the physical printing of the checks.
Printing Checks
To perform the physical printing for a check run, navigate to Purchases > Transactions > Print Checks. This will bring up a dialog that lets you select the prepared check run(s). Note that different payment rules will be treated separately. The Document No. field will show the next check number to be printed. It will normally default to the next available number, but can also be manually adjusted if desired.
In the text and previous lab exercises, we created two separate check runs, one for each vendor. In the example below, we have selected the run that corresponds to the $197 payment to vendor Ethiopian Free Trade Consortium:
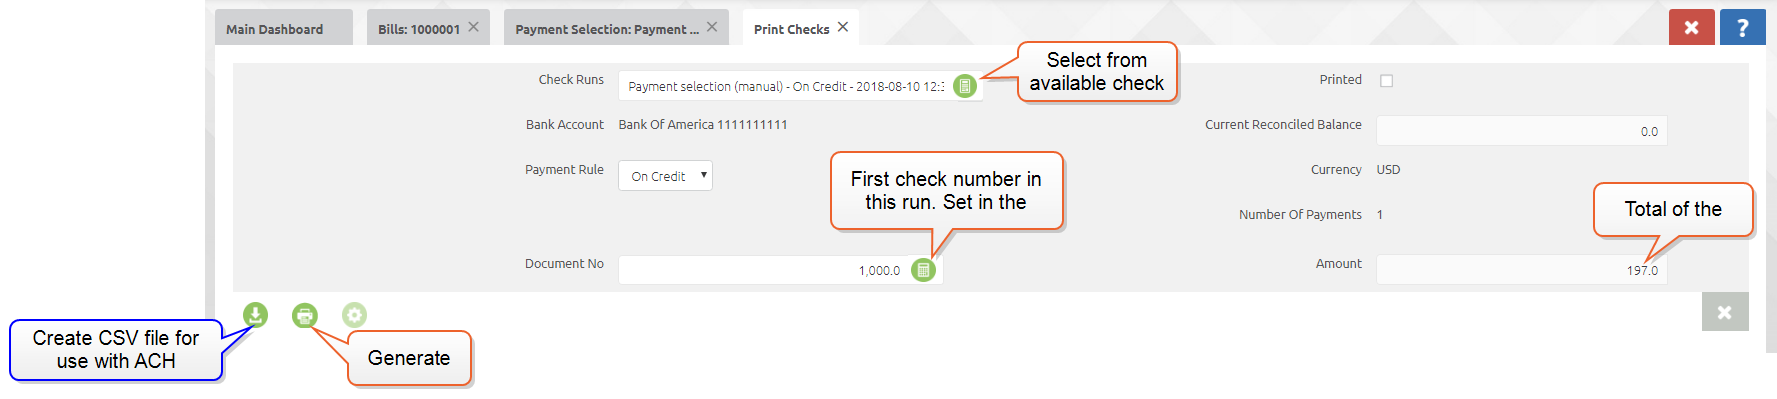
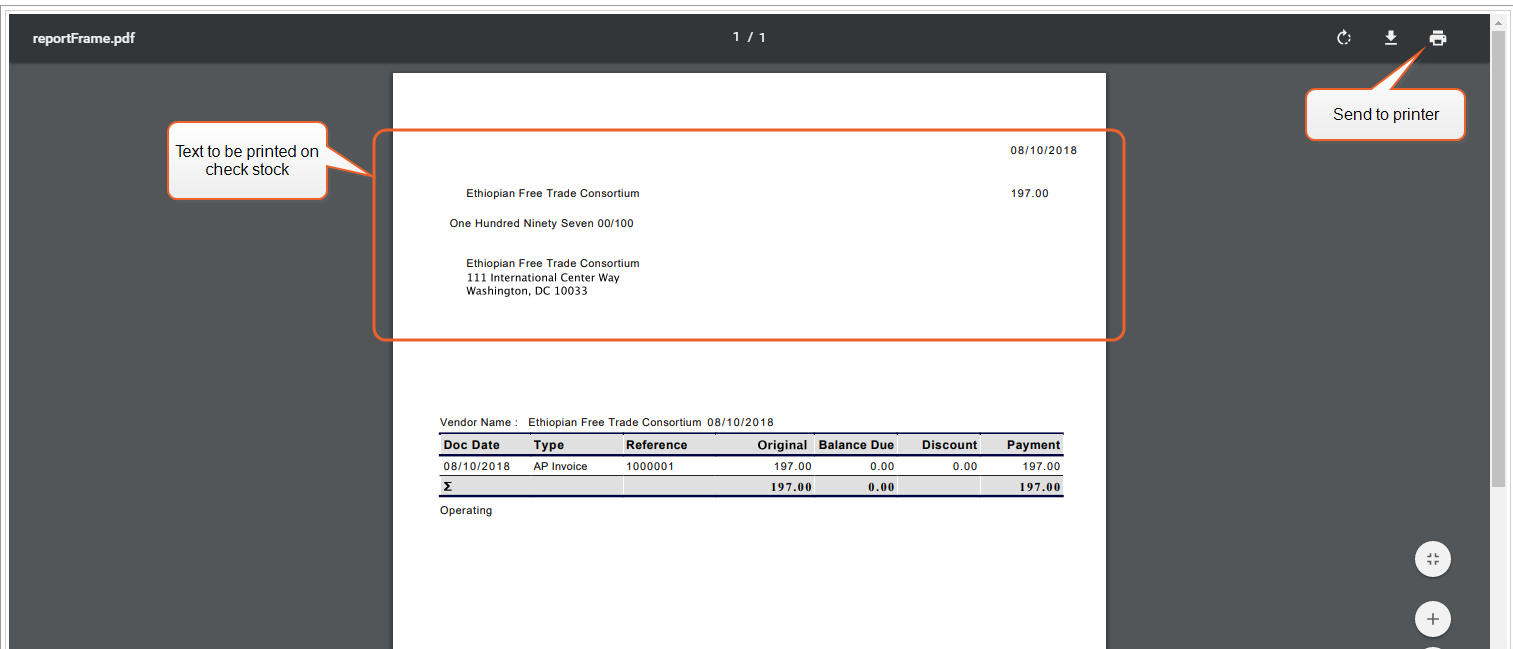
Clicking on the green printer icon on the lower left will create the files which can then be sent to your printer. When you click the icon, it will bring up a dialog box asking if you want to print remittance advice. If you indicate yes, two pdf files will be generated and will appear in new tabs, one with the check text, and another with the remittance advice. Clicking the X to reject will result in just the check print being generated.
The final step is then to print the PDF file to your printer that contains the check stock:
In the Check Run window, in the Prepared Payment tab for the check run, the PRINTED box on the record will be checked to denote that the checks have been printed.
Sell Products to Customer
The individual steps involved in selling products to a customer are similar to those for purchasing:

First a sales order is created and transmitted to the customer, then the products listed on that SO are shipped, and finally the customer is billed and payment is received.
Creating a Sales Order
Creation of a sales order follows the similar process that is likely becoming familiar at this point: Creation of a header record, and then addition of the line items to be sold on the Order Line tab.
For this exercise we will sell a 50lb bag of coffee to customer "Addison Restaurant Group". First, we create the header record, by navigating to Sales > Transactions > Sales Orders, and then using the + New button:

Then add the product to be sold on the Order Line tab:

Again in similar fashion to other records, click back on the main Sales Orders tab, select the SO record and use DOCUMENT ACTION to set the document status to "Complete". This will finalize the sales order and make it ready for shipment.
Lab Exercise: Create a Sales Order
Creating a Shipment
Our customer is now eagerly awaiting delivery of their 50lb bag of finest Yirgacheff, so our next step is to ship it to them. This consists of creating the record of the shipment in the system as well as the physical act of shipping the items.
The shipment process mirrors the material receipt process: We will create the shipment directly from the Sales Order that it corresponds to. First, navigate to the Sales Order window by selecting the appropriate system-level tab (if already open) or by navigating to Sales > Transactions > Sales Orders. From here, we will select the appropriate sales order by clicking in the line, and use the RUN PROCESS menu to execute the Create Shipment/Invoice process.

In the dialog box that comes up, select both the "Shipment/Receipt" box and the "Invoice/Bill" box. (Checking this second box will create a customer invoice which will be used later when collecting payment from the customer.)
Accepting the dialog by clicking on the check mark will create the shipment record, and bring up a link that will take you to it. (The shipment would also be viewable by using the side menu to navigate to Sales > Transactions > Shipments):

The Shipment Line tab will show each line item and the quantity ordered.
Selecting the shipment record and clicking the PRINT button will offer several options in the drop-down menu. To assist the warehouse/shipping staff in picking the items-- that is, physically locating the items and preparing them for shipping-- select "Pick List CBOS Standard 2018". This will generate a page that shows which items need to be picked, and the option to make written notations:

Once the shipping staff have completed the picking, they would confirm this by entering the corresponding number into the PICKED QUANTITY field on the shipment line(s).
Then, using the same process of selecting the shipment record and clicking the PRINT button, they can select "Packing Slip CBOS Standard 2018" to print out a packing list that would be included in the box.
Finally, clicking on the PROCESS SHIPMENT button in the shipment record will allow you to complete the shipment, and will generate the appropriate ledger transactions.
Invoicing the Customer
Now that the products have been sold and shipped, the next step is to send an invoice to the customer for payment.
The invoices were created during shipping process, by checking the available option to do so.
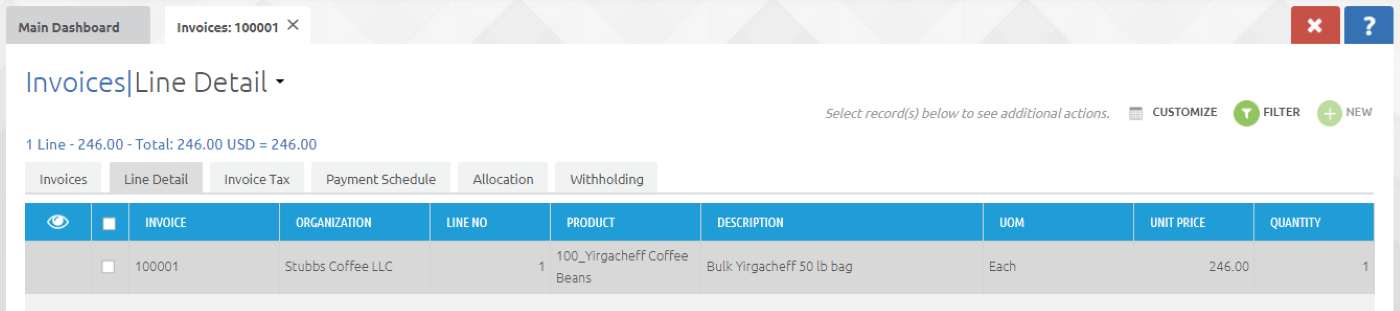
Those invoices can be viewed at Sales > Transactions > Invoices. At this time, they should be in Drafted status.
In standard fashion similar to other records, the invoice will show up as a header record, with the items listed on the Line Detail tab.
Once satisfied that all is correct, the invoice can be completed using the DOCUMENT ACTION button, and printed and sent to the customer by selecting the record and using the PRINT button.
Lab Exercise: Invoicing the Customer
Additional info: Sales > Processes > Create Invoices for Multiple SOs
Entering Customer Payments
Payments received from customers can be recorded in the Customer Payments window (Sales > Transactions > Customer Payments).
To record a customer payment, create a payment record in the usual way by using the + New button. Then enter the Customer, and the Bank Account that the payment will be applied to. Verify the Tender Type (e.g. form of payment such as credit card or check) and select the right choice if not already correct.

Clicking on the icon in the INVOICE field will then bring up an item search window where you can select from any outstanding invoices for that customer:
Making that selection and then completing the record with the DOCUMENT ACTION button will apply the payment, set the PAID flag on the header record, and generate the posting. (As with other similar records, clicking on the POSTED button will show the posted transactions.)

Additional info: Click to Pay on the Invoices screen. (Could be up with Invoicing the Customer (also or instead).)
Lab Exercise: Customer Payment
Financial Transactions
Unlike the other process transactions, the items described here are not necessarily sequential. This section describes a number of commonly-used financial transactions that may apply at various times.
![]()
Bank/Credit Card Reconciliation
Need to reconcile vendor and customer payments. They don't go into the bank account until reconciled, they sit in an accrual transfer account.
Transactions in CBOS are initially stored in accrual transfer accounts until the reconciliation process is complete. This process consists of comparing a statement from the financial institution to the transactions in the appropriate accrual account, comparing the two, and finalizing the record.
The window for Bank/Card reconciliations is at Financials > Transactions > Bank/Credit Card Reconciliations. The reconciliation process uses the familiar header and detail record format.
To begin the reconciliation, create a header record in the usual fashion by using the + New button, and select the bank or card account and statement date. The system will assign a value in the RECONCILIATION NAME field corresponding to the date and time the record was created-- this can be overwritten or appended with a more descriptive name if desired:
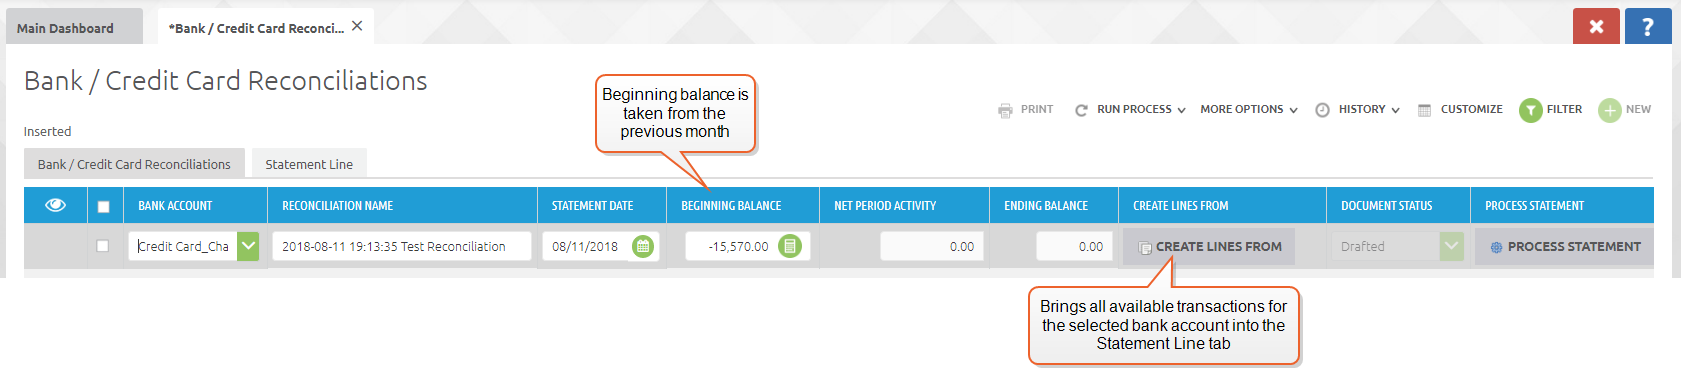
Clicking on the CREATE LINES FROM button will populate the Statement Line tab with all of the transactions currently available for the selected bank account.
On the Statement Line tab, check each of the transactions that you wish to include in the reconciliation. Once this step is complete, return to the Bank/Credit Card Reconciliations tab. The BEGINNING BALANCE field will show the balance from the previous month, the NET PERIOD ACTIVITY field will have been populated with the total from the selected lines, and, as expected, the ENDING BALANCE field will contain the difference between the two.
When you are satisfied with the results, complete the reconciliation using the PROCESS STATEMENT button.
Lab Exercise: Bank/Credit Card Reconciliation
Journal Entries
There will be various times when it will be necessary to make manual journal entries for transactions that are not part of the typical system flow, for instance recording receipt of a bank loan.
The window for making manual journal entries is accessed via Financials > Transactions > Journal Entries. Entries are made in similar fashion to other records in the system: A new record is created using the + New button. Document type should be "GL Journal", and Posting Type "Actual". You will also need to provide a document date, typically the date that the entry is being made.

Save the header record using the SAVE button on the lower right or Alt-C.
The actual entry is made using the Line tab. Selecting the Line tab will automatically create a new line. Select the account that this entry will be made in by using the selector icon in the ACCOUNT field. This will bring up an item search window that will allow you to search through your chart of accounts and select the appropriate one.
Depending on the nature of the entry, selections may be made for Product, Business Partner or Department. A description may also be added if desired. Finally, enter the amount of the credit or debit for this entry.

Clicking the SAVE AND ADD NEW button will save the entry and open a second line for the offset entry.

The entire entry will be posted by navigating to the header record and using the DOCUMENT ACTION button to set the document status to Complete.

Additional Info: Memorized entries
Lab Exercise: Manual Journal Entries
Reporting
There are a large number of reports available in the system, and they appear in various locations. There is a dedicated Reports menu item in the side menus, and reporting sections within other menus such as sales and purchases, in addition to some reports that are accessed via the SYSTEM menu.
Some reports also incorporate associated processes, such as the Replenish report, which offers the option of generating replenishment POs in addition to displaying the information.
The financial reporting options include a wide variety of transactional and balance-based reports as well as several different financial statements to choose from.
Financial Statements
To view the financial statements, navigate to Financials > Reports > Financial Reports.
Financial Statement reporting comes pre-configured and includes balance sheets, income statements, and cash flow reports. These reports may be customized and additional reports may be configured. Reports may also be configured to include budgetary data for comparison purposes.
In this example, we will select the Income Statement report to illustrate how financial statements may be run, and how it is possible to drill down to their supporting detail.
Select the Income Statement report and then click on the gray "Create Report" button to enter the report parameters.

Enter the report parameters for a given date range, and select the organization (you may only have one organization, but this is still a required field.

The report results will open up in the HTML format in a separate tabbed window. Here you may click on the amount column for any leaf account to drill down to the supporting detail.
In this example, we will click on the value for Product Revenue:

This will open a separate detailed window listing all of the source document postings and the account balances associated with the product revenue account.
From this screen, you can examine further by clicking on any document number to drill down to that actual document. To continue our example, we will click on invoice document number 100148:

This will open the Invoices window, showing that invoice number:

Additional Display and Export Options
In addition to the HTML web-based view shown above, reports can provide PDF and Excel output.
Navigate back to the report by clicking on the "Report: Income Statement" tabbed window.

Here you will see options for the two additional output types. The PDF option will display a PDF document that can be saved or viewed, and the Excel option will export the report to excel in a formatted view:
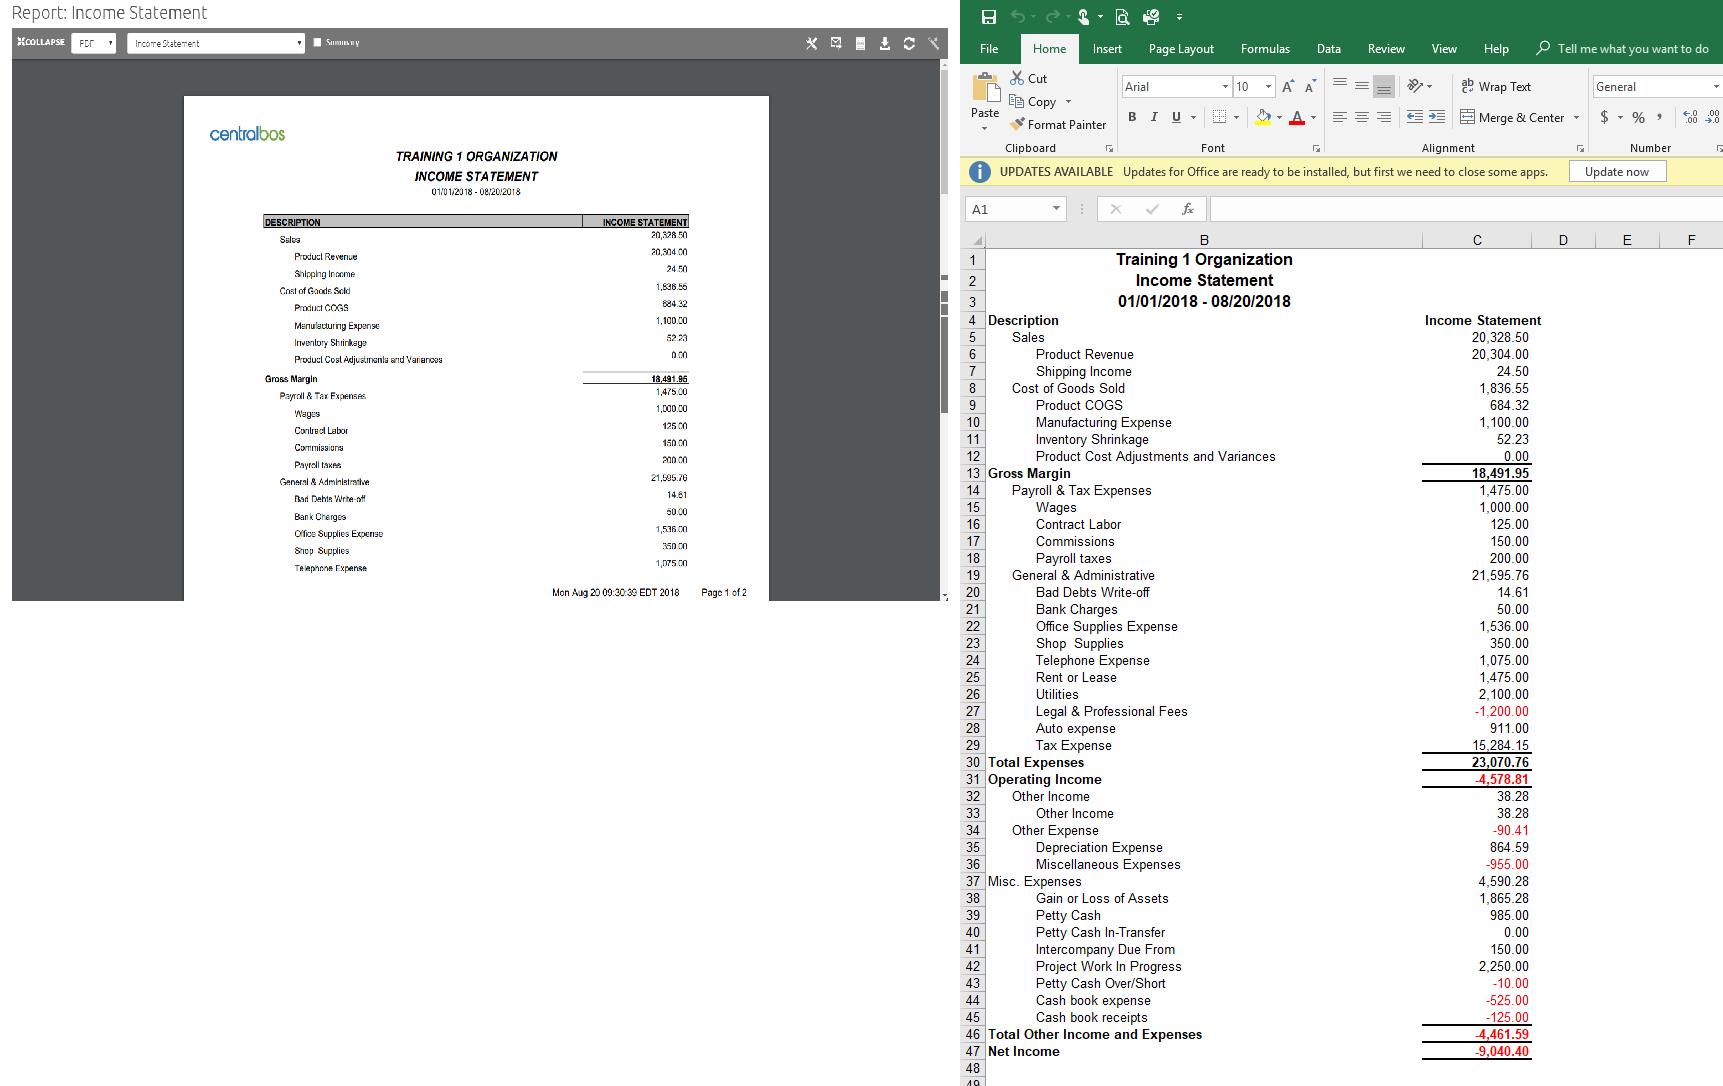
These options are available for most reports.
Lab Exercise: Reporting - Financial Statements
Trial Balance
Account balance reporting is available by executing the Trial Balance report at Financials > Reports > Trial Balance . Reports can be filtered by selecting one or more parameters shown below and clicking on START to run the report. Balance Sheet accounts are cumulative, and Income Statement accounts are based upon Account Date ranges.

As with the other reports, the results will display in a separate tabbed window:

GL Journal Entry Report
The GL Journal Entry report may include both manually entered and system-generated GL Journal Entries. It does not include postings from the AR, AP, and other sub-ledgers. It is just one of several transactional financial reports available.
The report is not accessed via the side menu, but rather via the SYSTEM MENU: GL Journal Entry Report
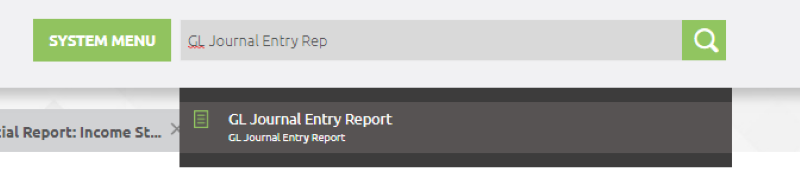
Selecting this report will bring up the run parameter window. Enter the report parameters to filter by and click on the START button to run the report.
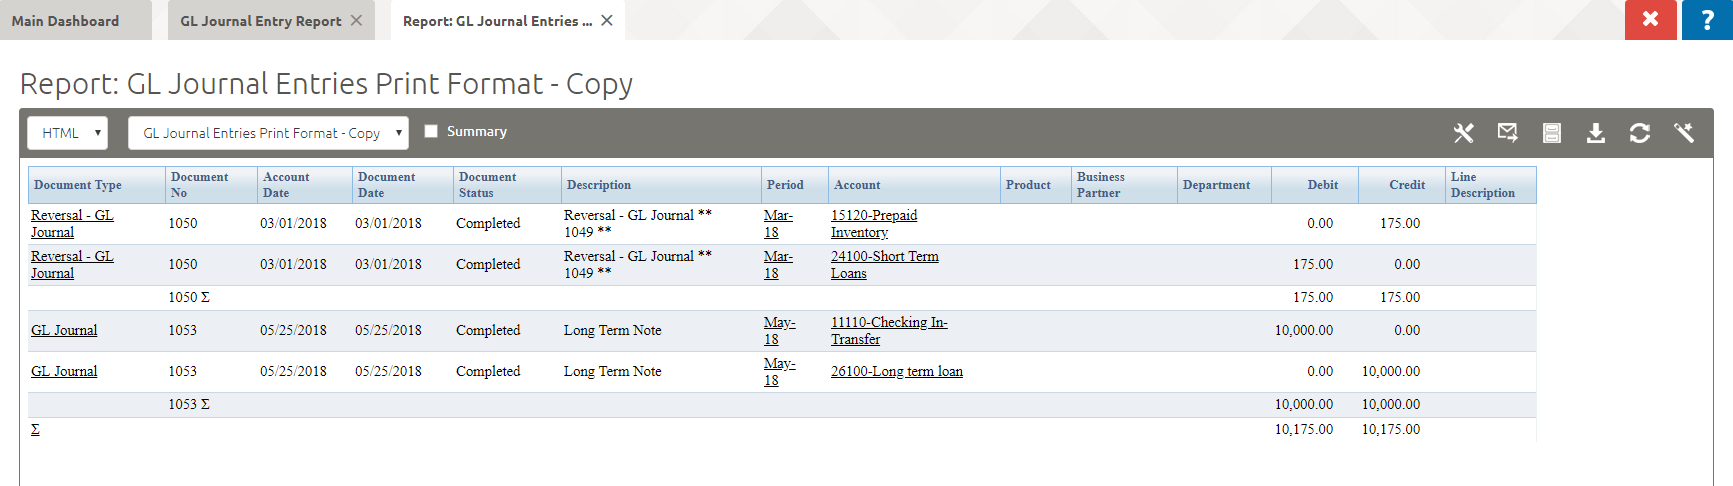
In this example, we have specified a report on journal entries posted from March 1 through May 31, 2018, with a document status of "Completed":

The available choices for GL Document and corresponding Document Status are shown below:
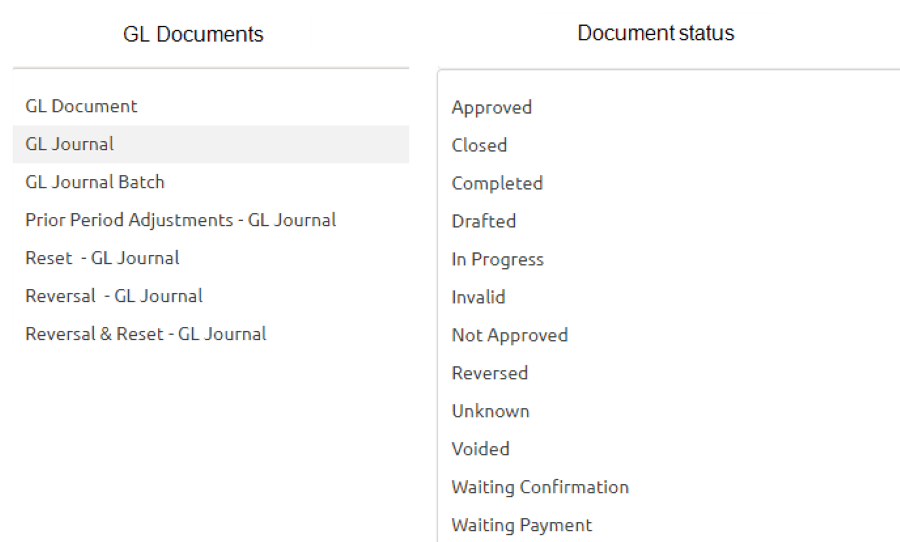
Here is the output from our example:
Lab Exercise: Reporting - GL Journal Entry Report
Accounting Fact Detail Report
The Accounting Fact Detail report (Reports > Financial > Accounting Fact Detail) is a transaction-based report that can include both system-generated and manually entered journal entries. This report can be filtered on: Accounting Schema, Organization, Account Dates, Period, Account, Business Partner, Product and Tax Code.
The screen showing the potential run parameters is the same format as that for the GL Journal Entry report.
In this example, we specified documents with status of "Complete" for the date range from Jan 1 through Aug 17, 2018.

Lab Exercise: Reporting - Accounting Fact Details Report
Additional Information
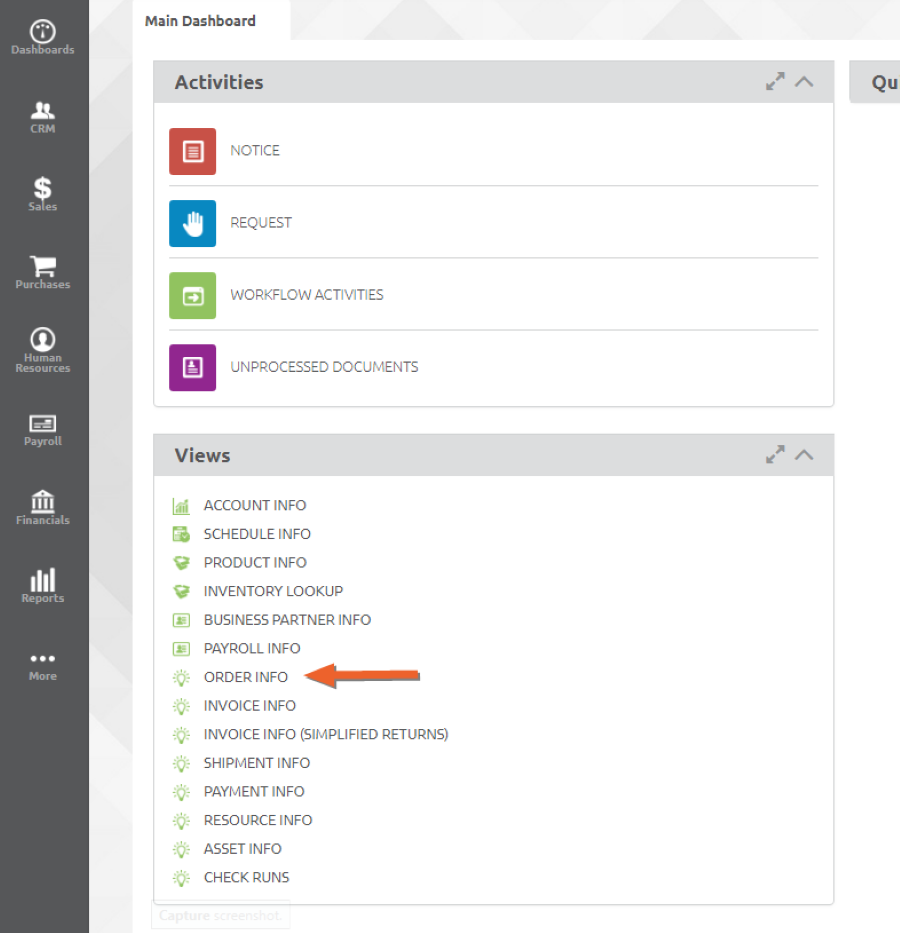
You may have noticed two areas on the Main Dashboard window in addition to Quick Links: Activities and Views. Not all of the items or their full capabilities are within the scope of the system introduction, but this section provides a general overview.
Dashboard Activities section
NOTICE - List of items that have an anomaly that may require attention, such as a posting error. A notice will also occur here if there a request is updated
REQUEST - This function is used to generate request items that can then be sent to other users for attention, for instance to log and track tasks within a team. Specific use will depend on your business need.
WORKFLOW ACTIVITIES - It is possible to define process workflows within the system. An example would be a process to require management approval for a purchase above a given limit. Workflow steps requiring attention will be listed here, based on the role of the user that is logged in. To continue the example, a manager of the appropriate level logging in would see an indication of purchases awaiting their approval.
The UNPROCESSED DOCUMENTS item in the main dashboard Activities window provides a count of all of the documents that have been created but are not yet in a completed state. (Remember that in the system, the term "document" refers to the complete set of records that make up an entity such as an Invoice or Sales Order.)

Clicking anywhere on the row will bring up a grid view showing all of the uncompleted items:

Click on the RECORD ID button to go directly to the document in question. In this example, we have clicked on the RECORD ID button for the first item, an invoice that is in Drafted status. (Clicking on the DOCUMENT NO link will show the record in edit view.)

From here, you can continue with the invoice as usual. (This is the same window that could be reached by the side menu (in this case Sales > Transactions > Invoices)-- the UNPROCESSED DOCUMENTS item just provides a handy summary for everything that still needs attention.)
Lab Exercise: Additional Information - Dashboard Activities
Dashboard Views Section
The various items in this section provide summary views of information that might otherwise require visiting several different windows. Two specific examples are given below:
Order Info
The ORDER INFO view shows summary information for sales orders, with the ability to drill down to more detail by double clicking on a selected sales order record. This view window also includes several search fields. The view is available on the Main Dashboard, in the Views section:
Completed Sales Orders will be appear on each line.
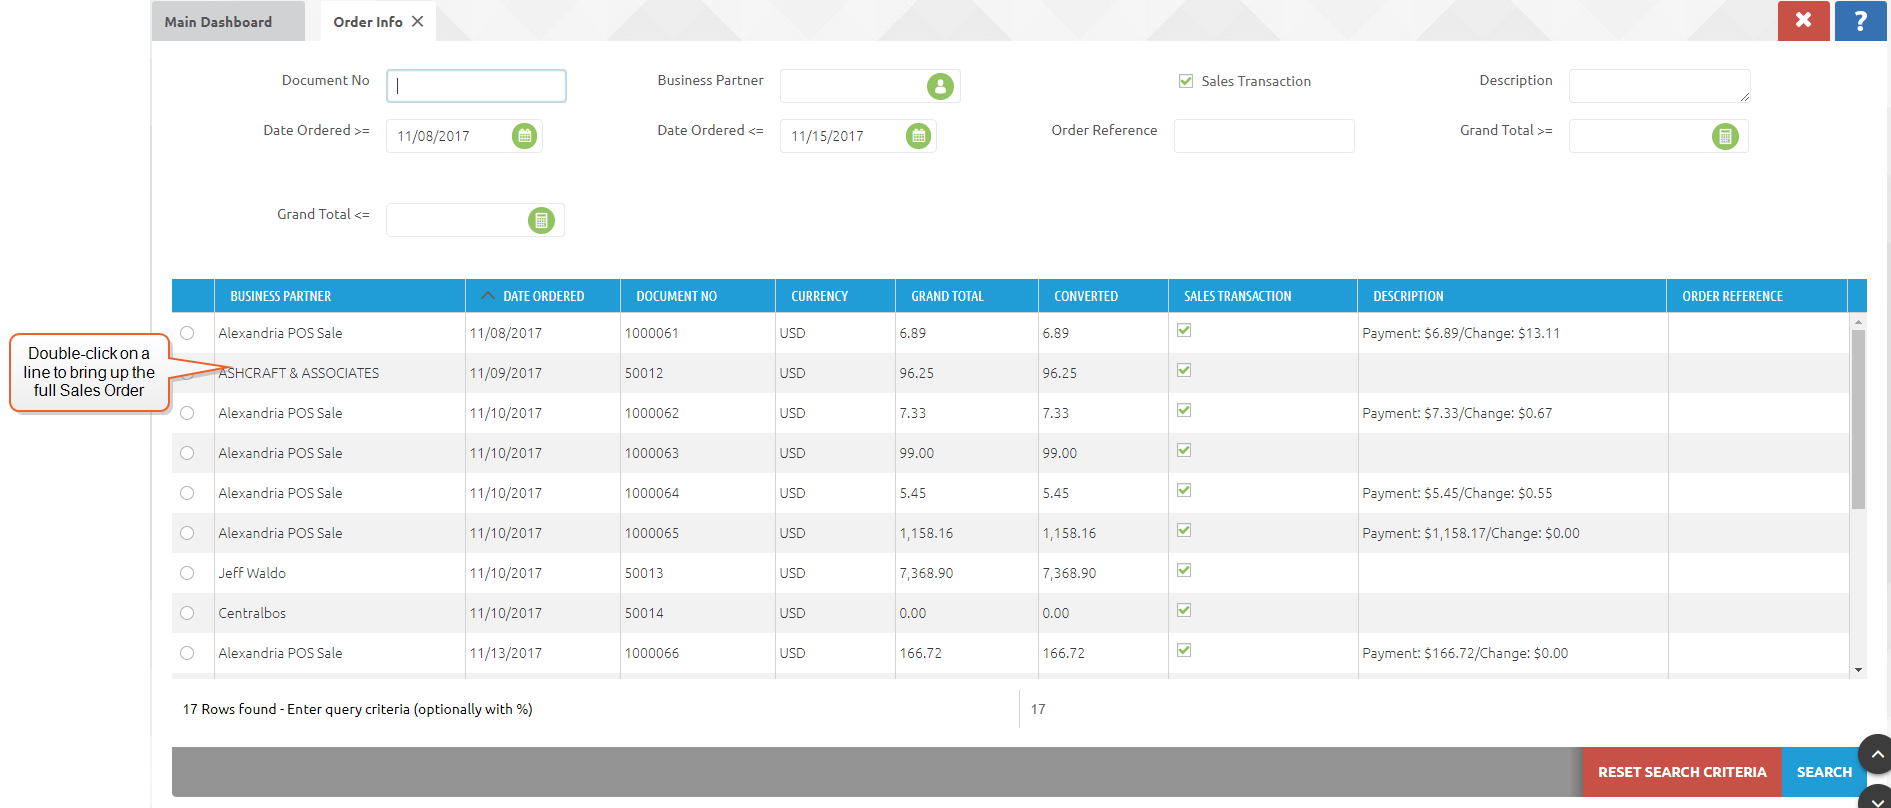
Double-clicking on a line will bring up the full sales order record in a separate tab, so that you can review order details and/or reprint the sales order:

Shipments and invoices associated with the sales order are available as always by selecting the line and using the HISTORY menu.

Invoice Info
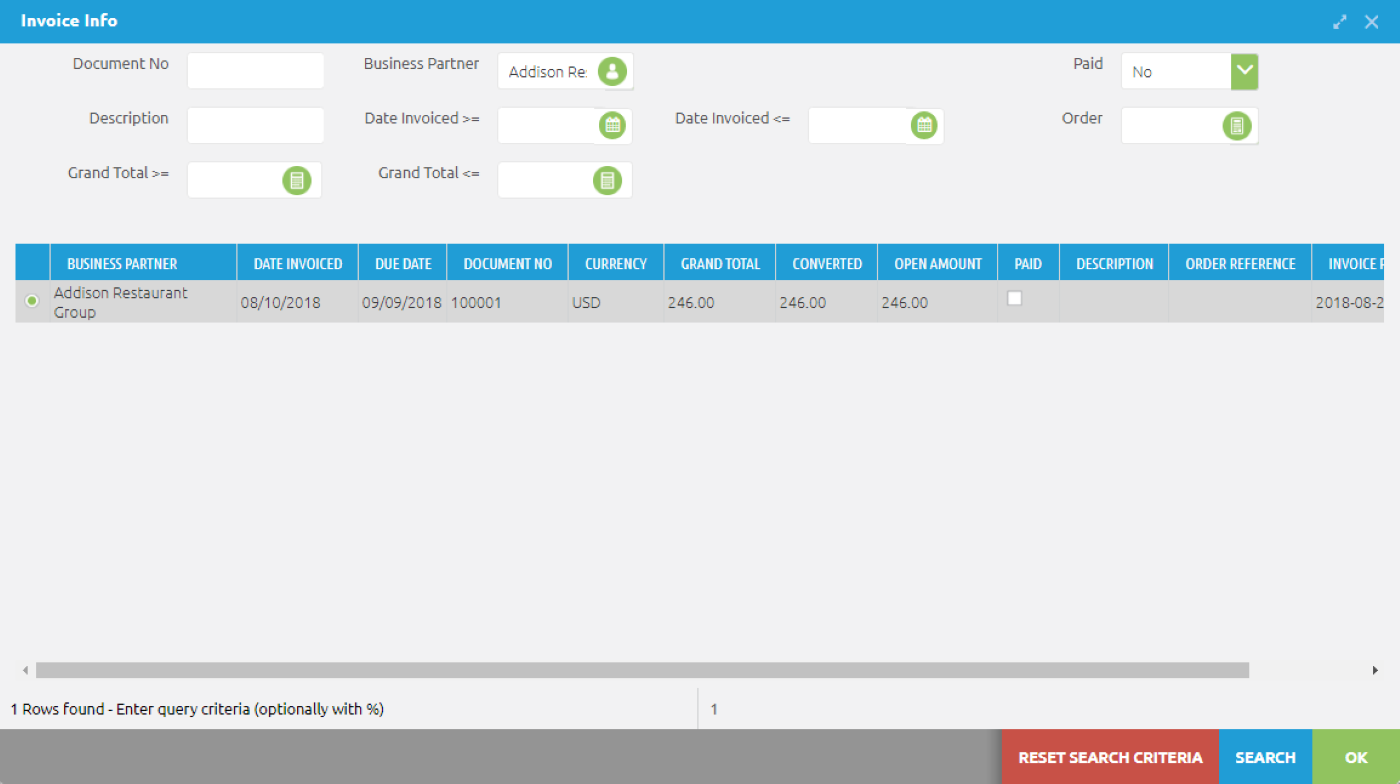
The INVOICE INFO view shows summary information for customer invoice, with the ability to drill down to more detail by double clicking on a selected sales invoice record. This view window also includes several search fields.
The view is available on the Main Dashboard, in the Views section.
Double-clicking on an invoice line will bring up that invoice up in a separate window. From here all order details and re-prints are available.

Select the History > Related Transactions option to view the sales order associated with that invoice number.
