How to Setup and Process Fixed Assets
Fixed Assets
A fixed asset is not purchased with the intent of immediate resale, but rather for productive use within the entity.
The following are examples of general categories of fixed assets:
- Buildings
- Computer equipment
- Computer software
- Furniture and fixtures
- Intangible assets
- Land
- Leasehold improvements
- Machinery
- Vehicles
Fixed assets are initially recorded as assets, and are subject to the following general types of accounting transactions:
- Periodic depreciation (for tangible assets) or amortization (for intangible assets)
- Impairment write-downs (if the value of an asset declines below its net book value)
- Disposition (once assets are disposed of)
A fixed asset appears in the financial records at its net book value, which is its original cost, minus accumulated depreciation, minus any impairment charges. Because of ongoing depreciation, the net book value of an asset is always declining. However, it is possible under international financial reporting standards to revalue a fixed asset, so that its net book value can increase.
A fixed asset does not actually have to be "fixed," in that it cannot be moved. Many fixed assets are portable enough to be routinely shifted within a company's premises, or entirely off the premises. Thus, a laptop computer could be considered a fixed asset (as long as its cost exceeds the capitalization limit).
Functional Summary
The fixed asset module’s current functionality may be summarized as follows:
- Assets Creation may be done by any of the following methods
- Vendor Invoice Lines
- Importing a data file
- Manual entry of the asset
- Create via Project Completion
- Asset Depreciation
- Supports the "straight-line" depreciation method
- Asset Disposal Processing
- Updates asset status
- Financial Postings are auto-generated from
- Asset Additions
- Asset Depreciation
- Asset Disposal
- Vendor Invoice Lines Asset Creation
- The vendor invoice line must reference an asset type item and be flagged to create a new fixed asset
- The invoice line must also match against a material receipt for that item
- Project Asset Creation
- Project types must be "asset"
The fixed asset module does not currently support the following types of transactions:
- Asset Transfer
- Asset Split
- Asset Revaluation
- Asset Financing
- Asset Depreciation using other than the straight-line depreciation method
Fixed Asset - Setup
Depreciation Method
Menu Path: SYSTEM MENU: Depreciation Methods
Only "Straight Line" is currently available. You will need to add a new record for "Straight Line Depreciation". Make sure to use "SL" as the value in the Depreciation Type column.

Setup Asset Groups
Menu Path: SYSTEM MENU: Asset Group
A separate Asset group is typically defined for each type of asset defined as such in the chart of accounts.
Enter the Asset Group name and select Owned, Depreciate and isFixedAssets.

Asset Group - Accounts
The group account tab is where you set all parameters related to depreciation calculation and all of the default posting accounts.
Some explanation of the fields:
- Accounting Schema: typical users will only have one default accounting schema. But for those who utilize more than one accounting schema, this means that you can have different depreciation methods and different account values for different accounting schema(s)
- Posting Type: "Actual" for operational uses
- Depreciation: currently only Straight Line is supported
- Depreciation (Fiscal): Depreciation method for fiscal reasoning (No use of it, currently only Straight Line is supported)
- Usable Life – Years: asset usable life (in years)
- Use Life – Years (fiscal): asset usable life (in years)
- Usable Life – Months: asset usable life (in months)
- Use Life – Months (fiscal): asset usable life (in months)
- Asset Acct: the valid combination account for recording Asset value
- Accumulated Depreciation Account: the valid combination account used for recording Accumulated Depreciation
- Depreciation Account: the valid combination account used for recording Depreciation Expense
- Disposal Revenue Acct: the valid combination account used for recording Disposal Revenue
- Disposal Loss Acct: the valid combination account used for recording Disposal Loss

Product Category
Menu Path: Purchases > Purchase Data > Product Category
Product Categories are used to group products and provide default posting accounts to their respective products. Product Groups are assigned to an Asset Group. Create a product category for each asset group and set the Asset Group value.

Set up general ledger posting accounts in the accounting tab. It is recommended to set up an account called "Fixed Asset Clearing" account in the fixed asset section of the Chart of Accounts. This is used when setting up the Product Category and Products, under the Accounting tab, and you should use this account in the field for "Product Expense".

Products
Menu Path: Purchases > Purchase Data > Products
Individual assets within an asset group are defined as products. For example, the asset group may be computers and an individual product maybe a Lenova T550 Laptop. You will need to setup a Product record for each respective asset within a group. The product will become the base for creating a Fixed Asset record.
Two important fields to be addressed are:
- Product Category: you must select the appropriate Product Category that has been paired with the Asset Group that this product belongs to
- Product Type: the product type must be set to "Asset"

General ledger accounts in the accounting tab default from the product category assigned to the product. It is advised to set up an account called "Fixed Asset Clearing" Account in the fixed asset section of the Chart of Accounts. This is used when setting up the Product Category and Products, under the Accounting tab, and you should use this account in the field for "Product Expense".

Charge Type - Manual Asset Addition
Menu Path: SYSTEM MENU: Charge Type
In order to create and activate assets manually you may optionally need to create a charge type code associated with the "Fixed Asset Addition" document type. This charge type will be referenced when setting up a charge code used in the manual asset addition process.


Charge – Manual Asset Addition
Menu Path: SYSTEM MENU: Charge
In order to create and activate assets manually you may optionally need to create a charge code associated with the charge type setup in the previous section. This charge code will be referenced when setting up an asset in the manual asset addition process.

Assign the Charge account in the window below. This account will be referenced in the Asset Addition manual posting process. Manual asset addition will debit the asset and credit the charge account associated with the charge assigned to the asset in the addition window. If no charge code is entered in the asset addition window, the system will use the "products expense" account number which is typically fixed assets clearing.

Asset Addition
Asset Addition is the main interface for recording new assets into CBOS.
There are four methods for adding new assets to the system:
- Asset Addition from Vendor Invoice
- The first method is addition from the Procurement flow
- Create PO and Material Receipt document using the asset base Product
- Go to Invoice (Vendor) and use the "Create Lines From" to automatically create Match Invoice during completing Invoice
- Then, go to Invoice Line. You should notice that the "Create Asset" flag is ticked
- Select "Capital" value on field "Capital vs Expense" and you'll see the related Asset Group value on field "Asset Group"
- Complete the Invoice
- Review Asset Addition
- Asset Addition from Import Asset
- Prepare your import data in an excel template file
- Import it to window Imported Fixed Assets
- Verify and process the import
- Asset Addition from Project
- Use Create Asset from Project to create any Open Project as new Asset
- The process will generate Asset and Asset Addition document and directly complete the Asset Addition document
- In the end, it will close the respective project
- The fact accounting entries generated are: Asset (DR)/Project Acct (CR)
- Asset Addition (manual)
- Manual means, you create the Asset manually on the Fixed Asset window
- Then create the Asset Addition document manually
- Select Source Type "Manual" and select the appropriate "Charge"
- The fact accounting entries generated are: Asset (DR)/ Charge (CR)
Fixed Asset Addition - from Vendor Invoice
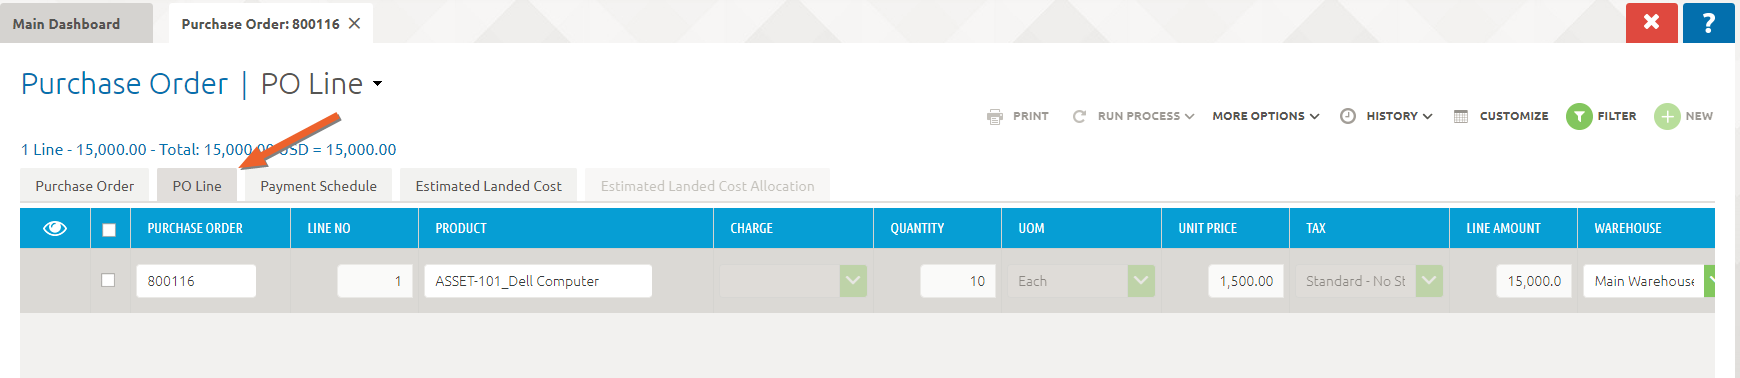
Create the Purchase Order
Menu Path: Purchases > Transactions > Purchase Orders
The first step in creating a new fixed asset from a vendor invoice is to create a PO. The only difference with this PO is to choose a product that has Asset as the Product Type.

The PO line product number, ASSET-101_Dell Computer, in this example has been defined as a "Asset" product type.
Receive Against PO
Menu Path: Purchases > Transactions > Material Receipt
Receive against PO as you would on any order (Material Receipt). Verify posting to correct accounts. This should be a debit to the "Fixed Asset Clearing Account" as mentioned above. Otherwise it will go to whatever account you had setup as "Product Expense" under the Product Category setup. The credit should be to "Not-invoiced Receipts".


Enter the Vendor Bill
Menu Path: Purchases > Transactions > Bills
Next, enter the Vendor Bill. Enter Vendor, Vendor Invoice number, and date. Make sure that you match against the Material Receipt. The best way to insure receipt matching is to use the Create Lines From - Receipts option.

Go into the edit view for each new line created.
- The Create Asset box should be checked, if not select it
- Select "Capital" under the drop down for Capital/Expense
- The Asset Group associated with the product should display, if not select it
- Make sure all the fields including Product, Quantity and Amount are correct
- Complete the bill to post and add new Fixed Asset and Asset Addition record(s)


Fixed Asset – from Vendor Invoice
Menu Path: Purchases > Purchase Data > Fixed Assets
Navigate to the Fixed Asset window and locate the new fixed asset record(s) created from the (vendor invoice) bill completion process. Locate the new asset(s) on the list window and click on the document number.
- Here you may enter serial numbers, year of manufacture, lot number, and in-service date
- There are other optional fields available
- The Active box should already be checked
- The fixed asset is initially created with Asset Status as "New"
- The Activation tab will show the Document Status as "Drafted" at this point
- Activation is done through the Asset Addition Process found in the Asset Addition window covered next

The Product, Asset Balances, Accounting Setup, Activation/Addition, Disposal, Asset History, and Insurance Information tabbed windows will all be covered in the manual fixed asset addition section of this guide.
Asset Additions – from Vendor Invoice
Menu Path: SYSTEM MENU: Asset Addition
Navigate to the Asset Additions window and locate the new asset addition record created from the (vendor invoice) bill completion process. Locate the new asset(s) on the list window and click on the document number.
- All required information should be filled in, just check for accuracy
- The Asset Group provides default information for the amounts fields such as "Delta Use Life Years" which can be updated if necessary
- To activate the asset, save and click on the Asset Addition Process button
- Check the posting
- It should debit the "Fixed Asset Account" based upon the Asset Group and credit the "Fixed Asset Clearing" account from the Product Expense account number


Fixed Asset Addition – Manual
Fixed Asset – from Manual Addition
Menu Path: Purchases > Purchase Data > Fixed Assets
The purpose of the fixed assets window is to uniquely identify each asset and record relevant information about the asset.
Navigate to the Fixed Asset window and enter the new asset manually. The required fields on this window include: Asset Id, Name, Asset Group, Product, Organization, and Status. Additional information that may be optional entered include: Serial Number, Lot Number, Manufactured Year, and In-Service Date. The initial status of the asset will be "New".
The Product, Asset Balances, Accounting Setup, Activation/Addition, Disposal, and Asset History tabbed windows are not populated until the Asset Addition/Activation step covered in the next section has been completed.

Insurance Information may be entered at this time. Required Insurance Information includes organization and Asset Id, all other information is optional.

Asset Additions
Menu Path: SYSTEM MENU: Asset Addition
The purpose of the Assets Addition window is to review and update important information regarding the asset before activating it.
Navigate to the Asset Addition window and enter the new asset information in manually. The required fields on this window include:
- Asset Id (internal id + asset name)
- Document Type (Fixed Asset Addition)
- Posting Type (Actual)
- Source Type (Manual)
- Entered Amount
- Current Qty
- Currency Type
- Delta Use Life Years
Additional information that may be optionally entered include: Charge (User Defined), Product, Locator, Description and Attribute Set. The initial status of the asset addition record will be "Drafted".

To activate and post the asset addition, save and click on the Asset Addition Process button to update the Document Status.


The asset addition status is updated to Complete.

Check the posting.
It should debit the "Fixed Asset Account" and credit the Charge account or the "Fixed Asset Clearing Account" if no Charge is specified.

Asset Addition – after completion / posting is done

Fixed Asset – from Manual Addition
Menu Path: Purchases > Purchase Data > Fixed Assets
The Product, Asset Balances, Accounting Setup, Activation/Addition, Disposal, and Asset History tabbed windows are now populated since the Asset Addition/Activation step has been completed.
Fixed Asset – Fixed Assets
The Fixed Asset status is updated to "Activated" upon completion of the Asset Activation. The status can be viewed on the Fixed Assets tab.

Fixed Asset – Activation/Addition
The Fixed Assets Activation/Addition tab window is populated upon completion of the asset activation.

Fixed Asset – Product
The Fixed Assets Product tab window is populated upon completion of the asset activation.

Fixed Asset – Asset Balances
The Fixed Assets Asset Balances tab window is populated upon completion of the asset activation.

Fixed Asset – Accounting Setup
The Fixed Assets Accounting Setup tab window is populated upon completion of the asset activation.

Fixed Asset – Disposal
The Fixed Assets Disposal tab window is populated upon completion of the asset activation. This information will only be processed when the asset is disposed.

Fixed Asset – Asset History
The Fixed Assets Asset History tab window is populated upon completion of the asset activation.

Fixed Asset Addition – Import & Projects
The following asset addition options will be covered in more detail in a future update to this training guide:
- Asset Addition from Import Asset
- Prepare your import data in an excel template file
- Import it to window Imported Fixed Assets
- Verify and process the import
- Asset Addition from Project
- Use Create Asset from Project to create any Open Project as new Asset
- The process will generate Asset and Asset Addition document and directly complete the Asset Addition document
- In the end, it will close the respective project. The fact accounting entries generated are: Asset (DR)/Project Acct (CR)
Fixed Asset – Transactions
Asset Depreciation
Depreciation is a method of reallocating the cost of a tangible asset over its useful life span of it being in motion. Businesses depreciate long-term assets for both accounting and tax purposes. The former affects the balance sheet of a business or entity, and the latter affects the net income that they report.
Generally, the cost is allocated, as depreciation expense, among the periods in which the asset is expected to be used. Methods of computing depreciation, and the periods over which assets are depreciated, may vary between asset types within the same business and may vary for tax purposes. These may be specified by law or accounting standards, which may vary by country. There are several standard methods of computing depreciation expense, including fixed percentage, straight line, and declining balance methods.
Depreciation expense generally begins when the asset is placed in service. For example, a depreciation expense of 100 per year for five years may be recognized for an asset costing 500. Depreciation has been defined as the diminution in the utility or value of an asset. Depreciation is a non-cash expenses. It does not result in any cash outflow. Causes of depreciation are natural wear and tear.
Run Depreciation Expense Entry (Report)
Menu Path: SYSTEM MENU: Depreciation Expense Entry
The purpose of the "Depreciation Expense Entry" report is to review depreciation entries that have processed (posted) and not yet posted.
![]()
Depreciate Fixed Assets
Menu Path: SYSTEM MENU: Post Depreciation Entry
The purpose of this application is to generate and post fixed asset depreciation entries for a given financial period.
- Select new and enter the mandatory fields for Document Type and Date
- Upon saving, unprocessed (un-posted) journal entries will be created for all assets scheduled to be depreciated during this time frame
- Go to the Records tab to see all of the unprocessed depreciation journal entries for each individual fixed asset
- Click Process Depreciation Entry and Complete, to post the summary entry to the general ledger. It should debit the "Depreciation Account" and credit the "Accumulated Depreciation Account" account
![]()
The Records tabbed window displays the individual asset detail to be included in the posting.
This detail included the individual assets, amounts, and account numbers that are referenced in the summary posting.
![]()
![]()
Asset Disposal
Menu Path: SYSTEM MENU: Asset Disposal
Asset disposal is the act of selling an asset usually a long-term asset that has been depreciated over its useful life like production equipment. The purpose of this application is to dispose of fixed assets that have been sold.
Processing steps include the following:
- Create a new asset disposal record
- Select document type and the fixed asset to dispose
- Upon asset selection, the system will auto-populate the asset cost, accumulated depreciation, expense, accumulated depreciation (delta) and asset status
- Update the disposed date and amount if needed
- Select Disposed method and reason. (reference only)
- Click Asset Disposed Process
- Select Complete and save to post the disposal entry
- The posting will credit the asset account and debit the accumulated depreciation account and either debit or credit the asset gain / loss account
![]()
For example: If you completed a depreciation document which includes Asset A in period Jun 2018. You cannot dispose of Asset A in period Jun 2018. A validation will stop you.
![]()
Fixed Assets – disposed status
Menu Path: SYSTEM MENU: Fixed Asset
In the Fixed Assets window and Fixed Assets tab the Asset Status should now be "Disposed".
![]()