Importing
This specific examples in this topic describe a Product record, but the general import process is similar for all record types.
The Product Record
Product records follow the same standards as other records in CBOS: There is a main tab that holds the primary descriptive information, and a number of tabs that hold additional information.

Importing Product Records
Typically a company will have a large number of product records-- too many to be practical for manual entry. For this reason, CBOS includes an import feature. (Although this topic focuses on product imports, other grid views support imports as well, such as Customers and Vendors.)
Creating a Template Using Export
In order to create a suitable import file, you need to know what fields are necessary. The easiest way to do this is to export an existing record of the type that you want, and use the exported file as a template. In the example below, we have navigated to the products grid view (Purchases > Purchase Data > Products), selected a line to make the MORE OPTIONS menu visible, and selected the export option from the drop-down menu. This brings up a dialog box that allows you to select export options. (For this example, note that we are not exporting any of the tabs, and are only exporting the currently selected row. Once you are comfortable with the process, you can create a template with additional fields by checking the boxes under "Select Tab To Export".)

Clicking the green check mark will download a file with a single record with columns corresponding to those that are in the current view. The important thing to note in this file is not the order of the columns, however, or even which ones are present, but the text in the first row. This is the name that the system uses for each field. In some cases, like "Name" and "Description", the field header text is obvious, but in many cases, the field name will not be so apparent. For instance, in our example below, note that the header text for Unit of Measure is "C_UOM_ID[Name]". This is why it is important to use an exported file as a template, to be sure the field names are correct.

Note also that in some cases the content of the fields in the export will be important as well. In the above example, the value "1008252" in the "M_Locator_ID" field equates to location "Main Floor".
Once you have populated this template file by creating a row for each of the products that you wish to import, you will be ready to import the data.
Performing the Import
A file import is done in a similar way to the export: Select any record to bring up the ![]() menu, then select the "Import" option. This will bring up a dialog to pick option and select the file from your computer that contains the upload data. For this example, we will use the default "Insert" Import Mode.
menu, then select the "Import" option. This will bring up a dialog to pick option and select the file from your computer that contains the upload data. For this example, we will use the default "Insert" Import Mode.

Clicking the green check mark will initiate the import, and the results will be displayed in an Excel file downloaded within your browser.
For the import file in this example, we entered a row for a product with part number "TEST-0001", resulting in the record being created as shown:

The insert mode was suitable for our example, because we were importing a new record that had not yet been entered into the system. In real-world use, there will be the potential for duplicate entries, and the need to modify records rather than simply adding them. For these more complex scenarios, the system provides two additional import modes.
Import Modes
There are three import modes that can be selected:
- Insert - Will add new records, and leave existing records unaffected. Does not check existing records, so could result in duplicates.
- Update - Will make changes to existing records. Fields in the import file will overwrite their corresponding fields in the table.
- Merge - Combines Insert and Update
Insert
Insert is a fast way to upload data, but because it does not check the existing records, there is a risk of duplication. For example, if we were to import the same file in our example a second time, using Insert mode, the system would have two separate, duplicate records for product TEST-0001.
Insert would typically be used only for initial input of large amounts of data.
Update
Update is used to make changes to existing records. It will check each existing record and compare it to the matching record in the import file. If there are differences, the fields that are different will be overwritten with the new data from the input file.
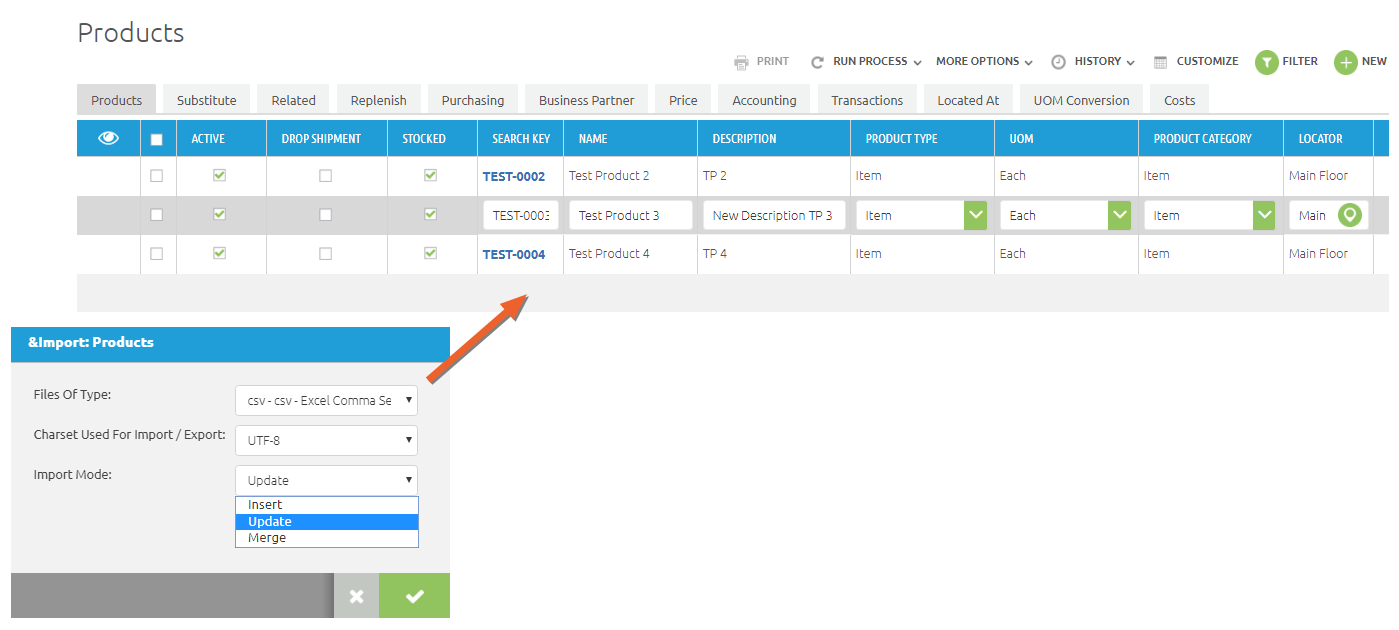
For this example, we will start with the three product records shown:

We will then use an import mode "Update" to change the description for product TEST-0003.
This raises a question: If the fields can be changed, how will the system know which record is which? In order to identify the records, one of the fields in the input file needs to be left unchanged and specified as the Key field. The key field should be a field that is unique to each record. Product records have an assigned SEARCH KEY field already, typically a unique part number, making it an easy choice.
To designate which field you want to use as the Key, append "/K" to the field title in the import file, as shown. (Do not leave a space between the field name and "/K".)

The system will see the /K and use the values in that column as key values.
By importing in Update mode, using the import file shown above, we see the following results. Note that the description has changed, but the other records remain unaffected. The system looked at each value in the column marked with the /K, compared the fields, and updated only the one that was changed.
As with the other imports, a log file will be downloaded in your browser window at the conclusion of the import. It is important to note that Update only makes changes to existing records. If a record is included in the input file that has no corresponding key field, the log file will tag that record as "not found".
Merge
The Merge input mode combines insert and update: It can be used to make changes to existing records, and will also add any records that are not currently present. It is also the only way to add new data to other tabs on an existing record (see "Additional Fields and Special Considerations" below).
Because Merge does support changes in the same way that Update does, the import file will require identifying a key field with /K as described above.
In the example below, we have changed the description of product TEST-0004, and added a new record for product TEST-0005.

Additional Fields and Special Considerations
As noted earlier in this topic, by selecting the check boxes for additional tabs during the export process, a large number of field headings can be exported, some of which may be appropriate to add to your import file for adding or modifying records. However, some considerations need to be made for different types of fields. To illustrate these considerations, we will import data to the "Related" tab on the product record for product TEST-0001.
When importing data to other tabs, additional key fields are required. For example, in the import file below, the main record header "Value" is identified as key field (by appending /K), and there is also a key identified for the specific tab, in this case the Related tab. Note that it is identifiable by the name, in this case "M_RelatedProduct>M_Product_ID[Value]. Both fields contain the same reference to the product number, but one applies to the main record, and the other is being used to compare to rows on the Related tab.

Also note that if you are adding data to a new tab as we are (as opposed to modifying existing data), the Update input mode will not work because it will not find an existing record. (If this did happen, you would see the error message in the log file that is downloaded after the import is done.) The Merge input mode is the best choice for this example.
Attention must also be paid to ensure that all required fields are entered, and that you do not attempt to modify a field which is not editable. You can always check these conditions by looking at a given record in edit mode. In the example below, we can see the required fields in red text and marked with an asterisk. To tell if a field is editable, click on the value to see if it allows input.

Another type of field to consider is the drop-down, selectable type, such as "Related Product Type" in the example above. When importing, you can input or modify existing choices for that field, but you cannot create a new choice. The selectable value must first be created in the system, then selected as part of the import process.
Executing an import with the file shown above results in the information being added to the Related tab for the product:

Additional Notes
Some additional items to consider for more involved import tasks:
- Some optional fields have default values. In other words, if the field is left blank in your import file, it may still have an assigned value after the import is complete. Again, the best way to be sure of what the final values will be is to perform an export, and copy those values.
- While many drop-down menus are user-defined, some are assigned by the system. Product Type is one such example. In this case, you will need to perform a sample export with all potential options selected so that you can see what the numeric codes are.
- Some elements can be imported as either a value or a name; the import process will convert the name to the corresponding numeric code used in the system.
- Not all values that can be exported for a given record are suitable as input values. For instance, price fields should be modified in the Price List window rather than in the product window.